
Overview
I built an MCP server that lets AI assistants read, write, and render Scapple files directly.
Background
Scapple is a brainstorming tool made by Literature & Latte. Many people use it alongside Scrivener, but it is also quite useful on its own for freely arranging and connecting ideas. One notable aspect is that its file format is XML-based. If you open a .scap file, you will find note coordinates, connection relationships, and style information all described in XML.
The starting point was wanting to say “turn this into a diagram” while talking to an AI assistant and have it immediately generate a Scapple file or render a PNG image. Since MCP (Model Context Protocol) allows you to provide tools to AI assistants, I decided to build an MCP server that handles Scapple files.
MCP is a protocol released by Anthropic that provides a standard interface for connecting external tools to AI assistants. Once you register a server with an MCP host like Claude Desktop or Claude Code, the AI can invoke those tools.
Features
1. read-scapple
Parses a .scap file and returns structured JSON. It extracts all note positions, sizes, text, styles, and connections. This can be used to have the AI analyze existing Scapple files or as a foundation for modifications.
2. write-scapple
Takes structured note data and creates a .scap file. You can specify coordinates, text, and styles for each note, with support for both bidirectional connections and unidirectional arrows. Bidirectional connections are automatically synchronized — connecting A to B automatically adds the reverse connection from B to A.
3. text-to-scapple
Automatically generates a diagram from indented text input. It supports bullet lists (-, *, •) and numbered lists (1., 2.), where indentation depth determines the hierarchy. Root notes are rendered as cloud shapes, child notes as rounded rectangles, and 8 colors are automatically assigned based on depth.
4. scapple-to-image
Converts a .scap file to a PNG image. The default is 2x scale for Retina displays, with customizable padding and themes.
Implementation
1. Architecture
The entire pipeline is divided into three stages.
Text/JSON → Parser/Builder → XML(.scap) → Renderer → PNG
- Parser — Parses XML into a
ScappleDocumenttyped object - Builder — Serializes a
ScappleDocumentobject into an XML string - Renderer — Converts a
ScappleDocumentto SVG, then generates PNG
The project file structure is as follows.
src/
├── index.ts                 # MCP server (4 tool definitions)
├── types.ts                 # Type system + DEFAULT_THEME
├── errors.ts                # Error class hierarchy
├── tools/
│   ├── read-scapple.ts
│   ├── write-scapple.ts
│   ├── text-to-scapple.ts
│   └── scapple-to-image.ts
└── lib/
    ├── parser.ts            # XML → ScappleDocument
    ├── builder.ts           # ScappleDocument → XML
    ├── layout.ts            # Text → auto-positioned notes
    ├── renderer.ts          # ScappleDocument → SVG/PNG
    ├── geometry.ts          # Bounding box, intersection calc
    ├── color.ts             # RGB ↔ Hex conversion
    ├── text-metrics.ts      # Text width measurement
    ├── id-range.ts          # ID range parsing/serialization
    └── svg/
        ├── index.ts         # Main SVG builder
        ├── shapes.ts        # Note shape rendering
        ├── connections.ts   # Connection/arrow rendering
        ├── text.ts          # Text rendering
        └── defs.ts          # SVG defs (shadows, patterns)
2. XML Parsing and Color Handling
Scapple’s XML format has a few unique characteristics. First, it represents colors as RGB floats in the 0–1 range. A value like "0.5 0.25 0.75" differs from the usual hex colors, so a conversion layer is needed.
export function rgbToHex(color: RGBColor): string {
  const r = Math.round(Math.min(1, Math.max(0, color.r)) * 255);
  const g = Math.round(Math.min(1, Math.max(0, color.g)) * 255);
  const b = Math.round(Math.min(1, Math.max(0, color.b)) * 255);
  return `#${r.toString(16).padStart(2, "0")}${g.toString(16).padStart(2, "0")}${b.toString(16).padStart(2, "0")}`;
}
Another characteristic is that note connections are expressed as ID range strings. "1,3-5,7" means [1, 3, 4, 5, 7]. There is a parseIdRange/serializeIdRange function pair that expands these in the parser and compresses them back in the builder.
export function parseIdRange(value: string): number[] {
  if (!value.trim()) return [];
  const ids: number[] = [];
  const parts = value.split(",");
  for (const part of parts) {
    const trimmed = part.trim();
    if (trimmed.includes("-")) {
      const [startStr, endStr] = trimmed.split("-");
      const start = parseInt(startStr.trim(), 10);
      const end = parseInt(endStr.trim(), 10);
      if (!isNaN(start) && !isNaN(end)) {
        for (let i = start; i <= end; i++) {
          ids.push(i);
        }
      }
    } else {
      const id = parseInt(trimmed, 10);
      if (!isNaN(id)) ids.push(id);
    }
  }
  return ids;
}
The parser uses fast-xml-parser with the isArray option configured so that Note, Shape, and Style tags are always parsed as arrays. This prevents the issue where a single XML element gets parsed as an object instead of an array. After parsing, the parser validates note ID uniqueness and connection reference integrity.
3. Bidirectional Connection Synchronization
When you connect two notes with a line in Scapple, both notes record each other’s ID. However, if an API user only specifies a connection from A to B, the reverse connection from B to A can be missing. The ensureBidirectionalConnections function in the builder handles this automatically.
function ensureBidirectionalConnections(notes: ScappleNote[]): ScappleNote[] {
  const connectionMap = new Map<number, Set<number>>();

  for (const note of notes) {
    if (!connectionMap.has(note.id)) {
      connectionMap.set(note.id, new Set());
    }
    const set = connectionMap.get(note.id)!;
    for (const connId of note.connectedNoteIDs) {
      set.add(connId);
    }
    for (const ptsId of note.pointsToNoteIDs) {
      set.add(ptsId);
    }
  }

  for (const [noteId, connections] of connectionMap) {
    for (const connId of connections) {
      if (!connectionMap.has(connId)) {
        connectionMap.set(connId, new Set());
      }
      connectionMap.get(connId)!.add(noteId);
    }
  }

  return notes.map((note) => {
    const allConnections = connectionMap.get(note.id) ?? new Set<number>();
    const pointsToSet = new Set(note.pointsToNoteIDs);
    const connectedIds = [...allConnections].sort((a, b) => a - b);
    return { ...note, connectedNoteIDs: connectedIds, pointsToNoteIDs: [...pointsToSet] };
  });
}
It collects all connections from every note into a map, automatically adds reverse connections, and sorts them. connectedNoteIDs is the bidirectional connection list, while pointsToNoteIDs is the unidirectional list that determines arrow direction. Arrows are only rendered for connections included in pointsToNoteIDs.
4. SVG Rendering
The core of rendering is converting a ScappleDocument into an SVG string. The buildSvg function stacks SVG elements in order: bounding box calculation, background drawing, background pattern, connection lines, note shapes, and text.
An important consideration in connection line rendering is that lines should not start from the note center. The intersection point between the line from one note center to another and the note rectangle must be calculated so the line starts from the border. The lineRectIntersection function handles this calculation.
export function computeConnections(notes: readonly ScappleNote[]): ConnectionLine[] {
  // ...
  const fromCenter = centerOf(noteToRect(note));
  const toCenter = centerOf(noteToRect(target));
  const hasArrow = pointsToSet.has(connId);

  const from = lineRectIntersection(toCenter, fromCenter, noteToRect(note));
  const to = lineRectIntersection(fromCenter, toCenter, noteToRect(target));

  lines.push({ from, to, hasArrow });
  // ...
}
Connections with arrows render arrowheads using SVG marker elements. Already-drawn connections are deduplicated using a drawnPairs Set.
Note borders support four styles: Rounded, Square, Cloud, and None. The Cloud style is the most complex, procedurally generating a cloud shape using quadratic Bezier curves.
function buildCloudPath(x: number, y: number, w: number, h: number): string {
  const bumpRadius = 12;
  const hBumps = Math.max(2, Math.round(w / (bumpRadius * 2)));
  const vBumps = Math.max(2, Math.round(h / (bumpRadius * 2)));
  // ...
  for (let i = 0; i < hBumps; i++) {
    const sx = x + i * hStep;
    const ex = x + (i + 1) * hStep;
    const mx = (sx + ex) / 2;
    parts.push(`Q ${mx} ${y - bumpRadius} ${ex} ${y}`);
  }
  // Right, bottom, and left sides follow the same pattern
  // ...
}
The note’s width and height are divided by bumpRadius * 2 to calculate the number of bumps, so larger notes get more bumps while smaller ones are guaranteed a minimum of 2. The four sides — top, right, bottom, left — are traversed in order, appending curves to form a single closed path.
The generated SVG is converted to PNG using the sharp library. By setting the density option to 72 * scale, high-resolution images for Retina displays can be generated.
const density = 72 * scale;
const result = await sharp(svgBuffer, { density })
  .png()
  .toFile(outputPath);
5. Theme System
Themes use the RenderTheme type consisting of 18 properties, divided into four groups: canvas background (color, pattern, pattern color), note styles (border color/width, border radius, shadow, default fill/border), text (font, size, color, alignment, padding), and connections (color, width, arrow color).
Theme application follows a cascade. The resolveTheme function overlays the .scap file’s document settings (background color, text color, font, padding) on top of the default theme, then overlays the user-provided theme on top of that. Additionally, the resolveNoteDefaults function applies per-note inline styles as the final priority.
function resolveTheme(theme: RenderTheme | undefined, settings: ScappleSettings): Required<RenderTheme> {
  const base: Required<RenderTheme> = {
    ...DEFAULT_THEME,
    backgroundColor: rgbToHex(settings.backgroundColor),
    defaultTextColor: rgbToHex(settings.textColor),
    defaultFont: settings.defaultFont,
    noteXPadding: settings.noteXPadding,
  };
  if (!theme) return base;
  return {
    backgroundColor: theme.backgroundColor ?? base.backgroundColor,
    backgroundPattern: theme.backgroundPattern ?? base.backgroundPattern,
    // ... remaining properties follow the same pattern
  };
}
Background patterns support three types: dots, grid, and lines, using SVG <pattern> elements to create 20x20px tiles that repeat across the entire canvas.
6. Auto Layout
The auto layout in text-to-scapple consists of two stages. First, indented text is parsed into a tree. Bullets (-, *, •) and numbers (1., 2.) are stripped, and parent-child relationships are determined by indentation depth. A stack-based algorithm compares the current line’s indent with the stack’s indent to construct the tree.
function parseIndentedText(text: string): TreeNode[] {
  const lines = text.split("\n").filter((l) => l.trim().length > 0);
  const roots: TreeNode[] = [];
  const stack: { node: TreeNode; indent: number }[] = [];

  for (const line of lines) {
    const trimmed = line.replace(/^[\s]*[-*•]\s*/, "").replace(/^[\s]*\d+\.\s*/, "");
    const indent = line.search(/\S/);
    const node: TreeNode = { text: trimmed.trim(), children: [], depth: 0 };

    while (stack.length > 0 && stack[stack.length - 1].indent >= indent) {
      stack.pop();
    }

    if (stack.length === 0) {
      roots.push(node);
    } else {
      stack[stack.length - 1].node.children.push(node);
    }
    stack.push({ node, indent });
  }
  return roots;
}
Once the tree is complete, layoutTree calculates coordinates. The X coordinate is depth * (160 + hGap), proportional to depth. The Y coordinate places leaf notes sequentially, then positions parent notes at the vertical center of their children. Note width is automatically determined by text length, with a minimum of 80px guaranteed.
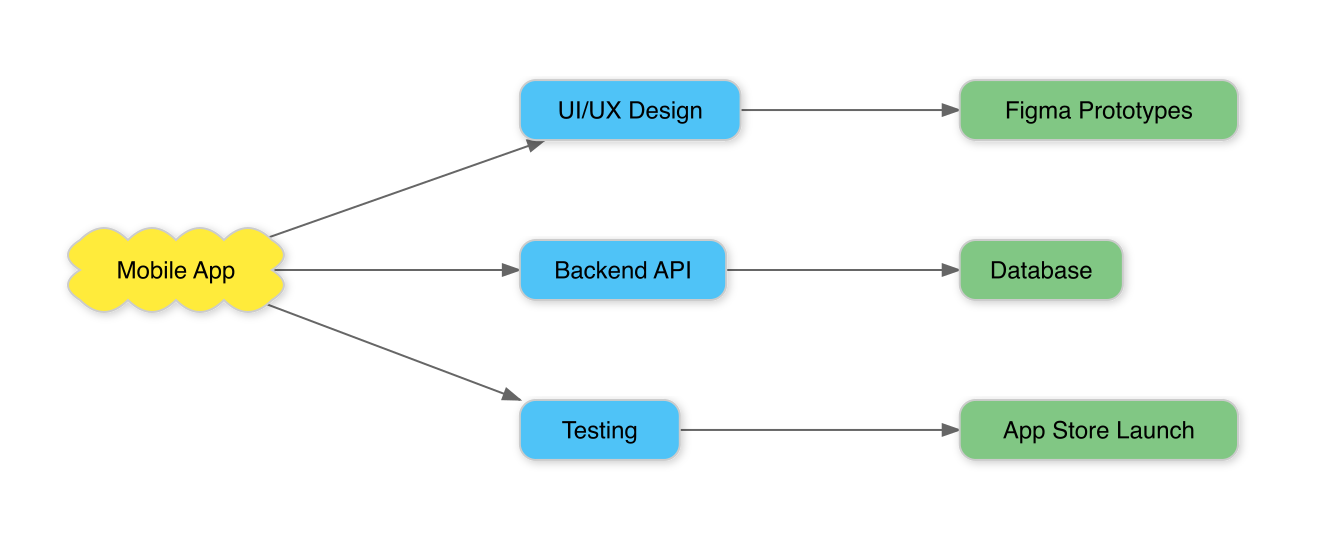
Eight colors (yellow, light blue, green, orange, purple, pink, teal, light yellow) are cyclically assigned based on depth. Root notes use Cloud borders, while child notes use Rounded borders.
Usage Examples
If you ask “create a brainstorming diagram about mobile app development”, the AI calls the text-to-scapple tool to automatically generate a diagram.
Here is the default theme rendering result.
And here is the same diagram with a dark theme applied.

An example dark theme configuration looks like this.
{
  "backgroundColor": "#1a1a2e",
  "backgroundPattern": "dots",
  "patternColor": "#333355",
  "lineColor": "#aaaaaa",
  "arrowColor": "#aaaaaa",
  "shadowEnabled": false
}
Installation
It is published on npm, so you can run it directly with npx.
npx @binaryloader/mcp-scapple
To register it as an MCP server in Claude Code, use the following command.
claude mcp add mcp-scapple -- npx @binaryloader/mcp-scapple
The source code is available on GitHub.


Leave a comment