
Overview
How to place and rotate circular menu items using sin, cos, and atan2 in iOS.
Core Formula
x = centerX + radius × cos(angle)
y = centerY + radius × sin(angle)
angle = atan2(y, x)
cos and sin convert an angle into coordinates to place menu items, while atan2 converts coordinates into an angle to implement touch rotation. This post breaks down why these formulas work, step by step from the very beginning.
Steps
1. cos and sin
1.1. The Ladder Analogy
Imagine a ladder leaning against a wall.

Lay the ladder flat and the horizontal distance increases while the vertical height decreases. Stand it upright and the opposite happens. The distribution between horizontal and vertical changes with the angle.
If the ladder length is 100%, you can express the horizontal and vertical portions as percentages. The name for the horizontal ratio is cos and the vertical ratio is sin.
1.2. Why cos = x and sin = y
In a right triangle, cos = adjacent ÷ hypotenuse and sin = opposite ÷ hypotenuse. When the hypotenuse (ladder length) is 1, the division disappears.
cos = adjacent ÷ 1 = the adjacent side itself
sin = opposite ÷ 1 = the opposite side itself
Place this triangle on a coordinate plane: adjacent = x-axis direction, opposite = y-axis direction. So cos is the x-coordinate and sin is the y-coordinate.
1.3. The Unit Circle
Spin the ladder in a full circle and the tip traces a circle. A circle with radius 1 is called the unit circle.

Any point on this circle can be expressed as (cos θ, sin θ).
1.4. Value Range: -1 to 1
You can never leave the unit circle, so cos and sin are always between -1 and 1.
cos = +0.7  →  rightward 70% of the radius
cos = -0.7  →  leftward 70% of the radius
sin = +0.7  →  downward 70% of the radius (iOS)
sin = -0.7  →  upward 70% of the radius (iOS)
cos/sin are a ratio table that answers: at this angle, what fraction of the radius do you move horizontally/vertically?
2. Radians
2.1. What Is a Radian
A radian is the distance walked along the circumference of a unit circle (radius = 1).

- Circumference = 2 × π × 1 = 2π ≈ 6.28
- Full circle = 6.28 radians = 360°
- Half circle = π ≈ 3.14 radians = 180°
- Quarter circle = π/2 ≈ 1.57 radians = 90°
2.2. Key Conversion Values
| Turn | Radians | Degrees |
|---|---|---|
| 1 | 2π (6.28) | 360° |
| 1/2 | π (3.14) | 180° |
| 1/4 | π/2 (1.57) | 90° |
| 1/8 | π/4 (0.79) | 45° |
Degrees → Radians: degrees × 0.0174  (= degrees × π ÷ 180)
Radians → Degrees: radians × 57.3    (= radians × 180 ÷ π)
2.3. Radians in Swift
Swift’s cos() and sin() only accept radians.
cos(90)        // ❌ Interpreted as 90 radians = 5156°
cos(.pi / 2)   // ✅ This is 90°
3. The iOS Coordinate System
3.1. The y-axis Is Flipped

In math, y increases upward. In iOS, y increases downward.
3.2. Rotation Direction

Because the y-axis is flipped, the same code produces counter-clockwise in math = clockwise in iOS. Thanks to this, starting at -π/2 (12 o’clock) naturally places items clockwise.
4. Circular Placement Calculation
4.1. The Full Flow
Full circle (2π) ÷ count = one slice
-π/2 + index × one slice = angle
cos(angle), sin(angle) = ratio
ratio × radius = actual distance
center + actual distance = final coordinate
4.2. Step-by-Step Calculation (8 Icons)
Place 8 icons clockwise from 12 o’clock with center (200, 200) and radius 120.
4.2.1. Full circle in radians
2 × π = 2 × 3.14159 = 6.28318 radians
4.2.2. Divide into 8 slices
6.28318 ÷ 8 = 0.78540 radians (= 45°)
4.2.3. Move start to 12 o’clock
0° points to 3 o’clock (right). To reach 12 o’clock, go back 1/4 turn.
6.28318 ÷ 4 = 1.5708
Backward (negative): -1.5708 radians (= -90°)
4.2.4. Each icon’s angle
Formula: -1.5708 + i × 0.78540
i=0:  -1.5708 + 0 × 0.7854 = -1.5708  → -90°  (12 o'clock)
i=1:  -1.5708 + 1 × 0.7854 = -0.7854  → -45°  (1-2 o'clock)
i=2:  -1.5708 + 2 × 0.7854 =  0       →   0°  (3 o'clock)
i=3:  -1.5708 + 3 × 0.7854 =  0.7854  →  45°  (4-5 o'clock)
i=4:  -1.5708 + 4 × 0.7854 =  1.5708  →  90°  (6 o'clock)
i=5:  -1.5708 + 5 × 0.7854 =  2.3562  → 135°  (7-8 o'clock)
i=6:  -1.5708 + 6 × 0.7854 =  3.1416  → 180°  (9 o'clock)
i=7:  -1.5708 + 7 × 0.7854 =  3.9270  → 225°  (10-11 o'clock)
4.2.5. Get cos/sin ratios
Input is radians, output is a ratio between -1 and 1.
i=0:  cos(-1.5708)= 0.0000   sin(-1.5708)=-1.0000  (no horiz, 100% up)
i=1:  cos(-0.7854)= 0.7071   sin(-0.7854)=-0.7071  (right 70.7%, up 70.7%)
i=2:  cos(0)      = 1.0000   sin(0)      = 0.0000  (right 100%, no vert)
i=3:  cos(0.7854) = 0.7071   sin(0.7854) = 0.7071  (right 70.7%, down 70.7%)
i=4:  cos(1.5708) = 0.0000   sin(1.5708) = 1.0000  (no horiz, 100% down)
i=5:  cos(2.3562) =-0.7071   sin(2.3562) = 0.7071  (left 70.7%, down 70.7%)
i=6:  cos(3.1416) =-1.0000   sin(3.1416) = 0.0000  (left 100%, no vert)
i=7:  cos(3.9270) =-0.7071   sin(3.9270) =-0.7071  (left 70.7%, up 70.7%)
4.2.6. Multiply by radius (120)
Multiplying the ratio by the radius gives the actual distance in points.
i=0:  horiz  0.0000 × 120 =    0     vert -1.0000 × 120 = -120
i=1:  horiz  0.7071 × 120 =   84.9   vert -0.7071 × 120 =  -84.9
i=2:  horiz  1.0000 × 120 =  120     vert  0.0000 × 120 =    0
i=3:  horiz  0.7071 × 120 =   84.9   vert  0.7071 × 120 =   84.9
i=4:  horiz  0.0000 × 120 =    0     vert  1.0000 × 120 =  120
i=5:  horiz -0.7071 × 120 =  -84.9   vert  0.7071 × 120 =   84.9
i=6:  horiz -1.0000 × 120 = -120     vert  0.0000 × 120 =    0
i=7:  horiz -0.7071 × 120 =  -84.9   vert -0.7071 × 120 =  -84.9
4.2.7. Add center coordinates (200, 200)
i=0:  x = 200 +    0   = 200    y = 200 + (-120)  =  80    (12 o'clock)
i=1:  x = 200 +   84.9 = 284.9  y = 200 + (-84.9) = 115.1  (1-2 o'clock)
i=2:  x = 200 +  120   = 320    y = 200 +    0    = 200    (3 o'clock)
i=3:  x = 200 +   84.9 = 284.9  y = 200 +   84.9  = 284.9  (4-5 o'clock)
i=4:  x = 200 +    0   = 200    y = 200 +  120    = 320    (6 o'clock)
i=5:  x = 200 + (-84.9)= 115.1  y = 200 +   84.9  = 284.9  (7-8 o'clock)
i=6:  x = 200 + (-120) =  80    y = 200 +    0    = 200    (9 o'clock)
i=7:  x = 200 + (-84.9)= 115.1  y = 200 + (-84.9) = 115.1  (10-11 o'clock)
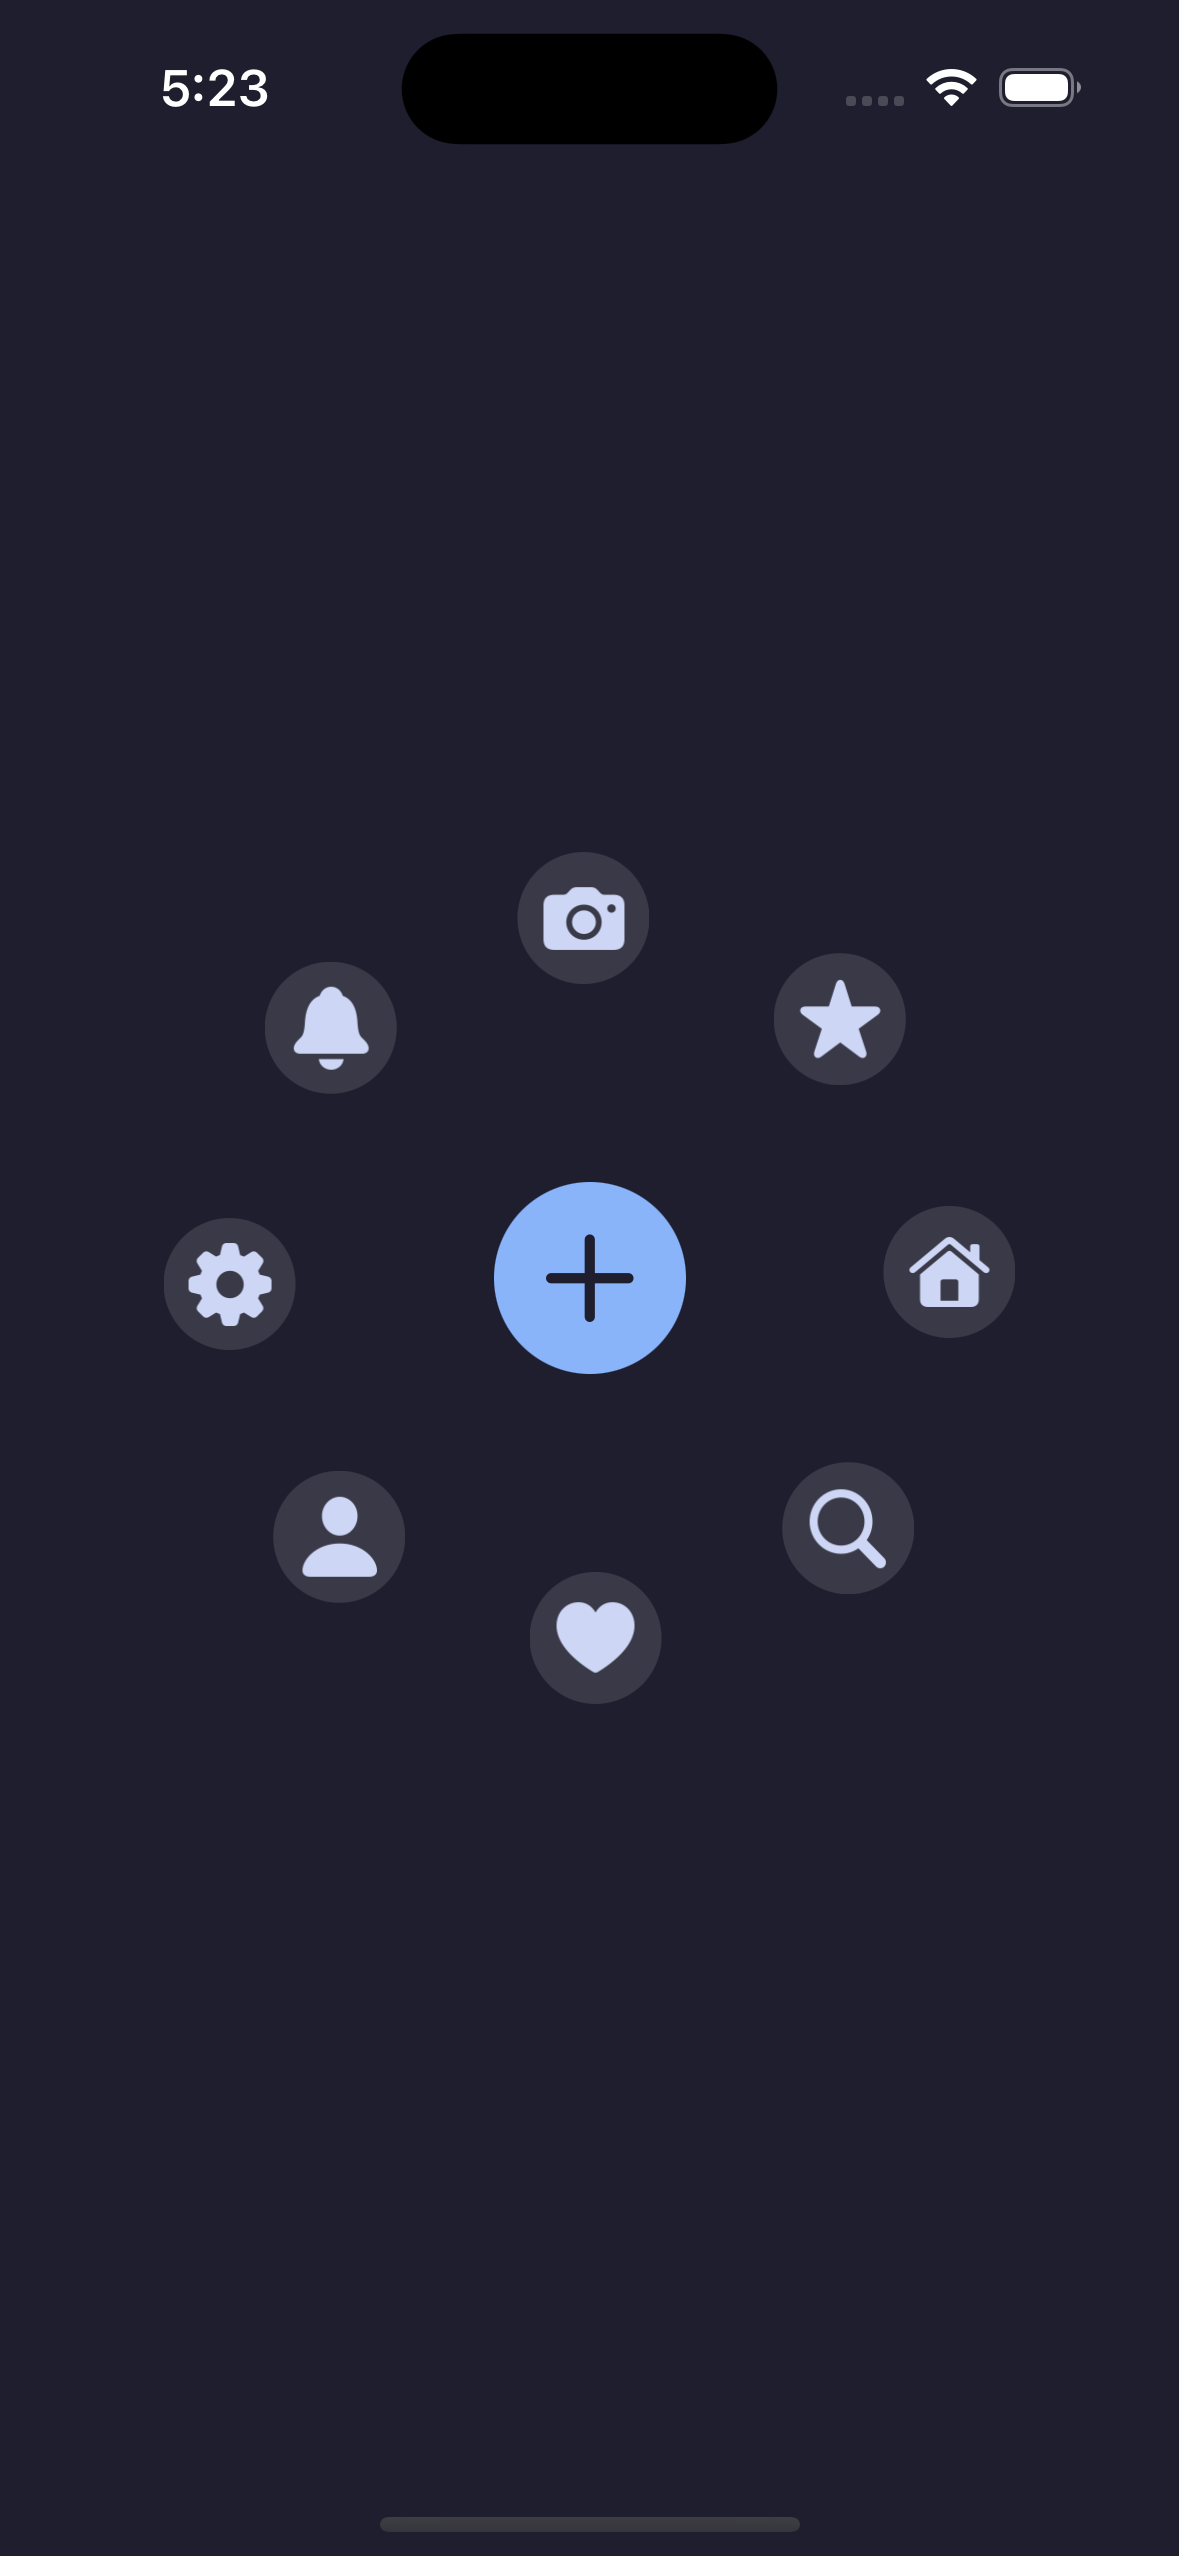
Visualizing the result:

5. atan2
cos and sin take an angle and return coordinates. atan2 does the opposite. It takes coordinates and returns an angle.

cos(angle) → x ratio      angle → coordinates
sin(angle) → y ratio      angle → coordinates
atan2(y, x) → angle       coordinates → angle
atan2(y, x) returns the angle in radians from the origin (0, 0) to the direction of (x, y).
- Return range: -π to π (-180° to 180°)
- 3 o’clock = 0, 6 o’clock = π/2, 9 o’clock = ±π, 12 o’clock = -π/2
The circular menu’s center is not the origin but the screen center (e.g. (200, 300)). Passing raw touch coordinates to atan2 would give an origin-relative angle, so you subtract the center to convert to center-relative coordinates.
Screen center = (200, 300), Touch = (296, 234)
Center-relative = (296 - 200, 234 - 300) = (96, -66)
atan2(-66, 96) → angle from center to touch point
let center = CGPoint(x: view.bounds.midX, y: view.bounds.midY)
let angle = atan2(point.y - center.y, point.x - center.x)
6. Rotation with Pan Gesture
To rotate the placed menu by dragging, you need to track the change in angle of the touch point.
6.1. Calculating Rotation
6.1.1. Touch Start (began)
panStartAngle = angle(for: touchPoint) - currentRotation
Subtract the current rotation from the touch angle to record the offset. This offset is the difference between the touch point and the menu’s rotation state.
touch angle = 0.5 rad, current rotation = 0.3 rad
offset = 0.5 - 0.3 = 0.2 rad
The offset ensures the menu doesn’t jump when you touch it mid-rotation; it continues smoothly.
6.1.2. Touch Move (changed)
currentRotation = angle(for: touchPoint) - panStartAngle
Subtracting the offset from the new touch angle gives the new rotation.
touch moves from 0.5 → 1.2
new rotation = 1.2 - 0.2 (offset) = 1.0 rad
rotation change = 1.0 - 0.3 (previous) = 0.7 rad of rotation
6.1.3. Recording Angular Velocity
angularVelocity = newRotation - previousAngle
previousAngle = newRotation
The change in rotation between frames is recorded as angular velocity. When the touch ends, this value becomes the initial speed for the deceleration animation.
6.2. Deceleration Animation
Instead of stopping abruptly when the touch ends, the menu gradually slows down like inertia.
6.2.1. CADisplayLink
CADisplayLink is a timer synchronized with the display’s refresh rate, firing once per frame.
displayLink = CADisplayLink(target: self, selector: #selector(step))
displayLink?.add(to: .main, forMode: .common)
6.2.2. Per-Frame Processing
let dt = link.timestamp - lastTimestamp         // time since last frame (seconds)
angularVelocity *= pow(0.92, CGFloat(dt * 60))  // decay
currentRotation += angularVelocity              // apply rotation
layoutMenuItems()                               // re-layout
- dt: time elapsed since the last frame in seconds. At 60fps this is about 0.0167s; it grows larger when frames are dropped.
- 0.92: decay factor. Speed decreases by 8% each frame.
- pow(a, b): a raised to the power of b.
pow(0.92, 3)= 0.92³ ≈ 0.779. - pow(0.92, dt × 60): ensures consistent deceleration regardless of frame rate. If dt is 1/60s (one frame), 0.92¹ = 0.92. If dt is 1/30s (frame drop), 0.92² ≈ 0.846.
- The timer stops when angular velocity falls below 0.0001.
6.2.3. How the Decay Factor Feels

| Factor | Decrease per Frame | Feel |
|---|---|---|
| 0.98 | 2% | Long slide (ice) |
| 0.95 | 5% | Smooth deceleration |
| 0.92 | 8% | Moderate deceleration |
| 0.85 | 15% | Quick stop |
7. Swift Implementation
7.1. Uniform Placement
let count = 8
let slice = (2 * .pi) / CGFloat(count)  // full circle (2π) ÷ 8 = 45° each

for i in 0..<count {
    let angle = -(.pi / 2) + CGFloat(i) * slice
    //          ↑ 12 o'clock ↑ which one  ↑ slice size

    let x = centerX + radius * cos(angle)  // cos = horizontal
    let y = centerY + radius * sin(angle)  // sin = vertical
}
7.2. Non-uniform Placement
For irregular spacing, specify each angle manually.
// Manually specify each icon's angle (radians)
let itemAngles: [CGFloat] = [
    -.pi / 2,            // 12 o'clock
    -.pi / 4,            // 1-2 o'clock
    0,                   // 3 o'clock
    .pi / 4,             // 4-5 o'clock
    .pi / 2,             // 6 o'clock
    .pi * 3 / 4,         // 7-8 o'clock
    .pi,                 // 9 o'clock
    .pi + .pi / 4        // 10-11 o'clock
]

for (i, angle) in itemAngles.enumerated() {
    let x = centerX + radius * cos(angle)
    let y = centerY + radius * sin(angle)
}
7.3. Pan Gesture Rotation
To apply rotation to the layout, add currentRotation to each icon’s angle.
let center = CGPoint(x: view.bounds.midX, y: view.bounds.midY)
let radius: CGFloat = 120
let slice = (2 * .pi) / CGFloat(menuItems.count)

for (i, item) in menuItems.enumerated() {
    let angle = -(.pi / 2) + CGFloat(i) * slice + currentRotation
    item.center = CGPoint(
        x: center.x + radius * cos(angle),
        y: center.y + radius * sin(angle)
    )
}
Angle conversion was covered in section 5, and pan gesture with deceleration animation in section 6.
Here is the actual implementation in a UIKit app.


Leave a comment